I’m a blockhead!

I’ve never really been a person who enjoyed mystery or surprises much (unless it’s a good book or movie, but not real life), so I’ve never really gone in for mystery knit/quilt-a-longs. I usually wait to see the final result, and then decided whether I want to make it. Then of course, the “a-long” part is usually over.

But last summer, Mom took part in a Moda QAL, and made the cutest little quilt top.

84245746_166651627996518_3704893700686479360_n

Not all the blocks were from the QAL. When she didn’t like a block, she went online and found something she did like and added it in. She ended up learning how to paper piece, upped her skills and make one adorable quilt (though she’s yet to actually quilt it… I’ve offered to do it, but she wants to get all fancy with it… we know I only do meanders or loops.)

Anyway, this is a kind of long way of saying… I joined a QAL! Moda has another group called the Moda Blockheads. It’s a year-long QAL with a block (or two), released each Wednesday. This is the third year they’ve done it.

This year they are offering something like 56 blocks in a variety of sizes from ranging from 4-12 inches. You choose which size you want, and you can even mix them up. Each week the designers offer tips, tricks and other options.

Because there are a huge range of sizes and options, they couldn’t give exact fabric requirements, but they estimated that completing all the 12 inch blocks would require about 30 fat quarters and several yards of background fabric.

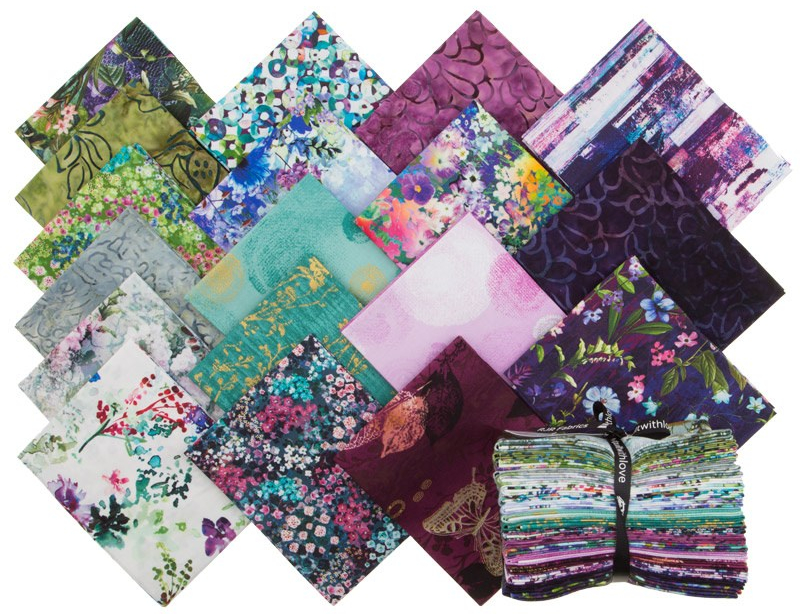
I didn’t have any fat quarter bundles with that many FQs, but I did have this.

1528125322568-20180529_563846_posymeadow_precuts_4445_hero

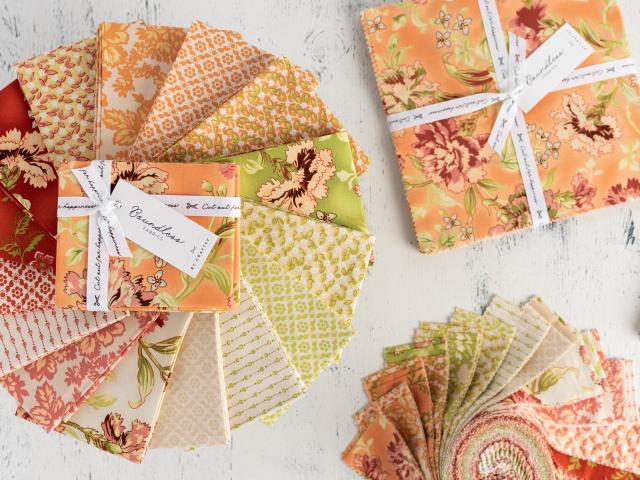
It’s Posey Meadow from Bluprint. It’s got 20 fat quarters, and I went through my stash and mixed in a few other pieces that would work. I’m not sure I’ll do all the blocks, so I may or may not have enough.  I’ll worry about it when I get to that point.

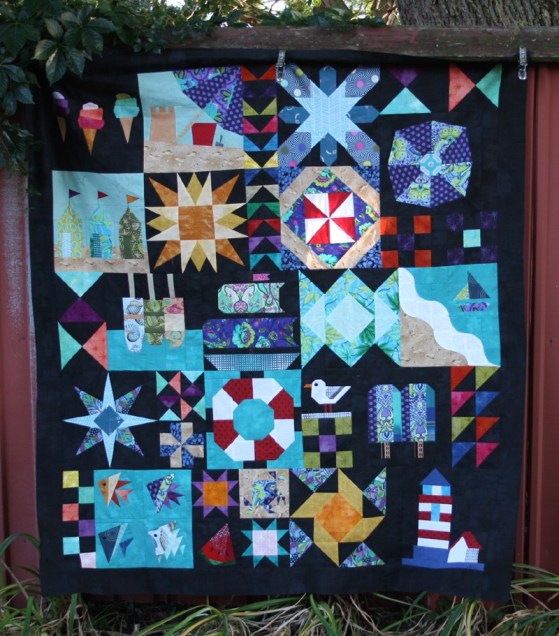
The first block was released on January 15th.  Several people found it challenging, but I quite enjoyed it.

IMG_0847

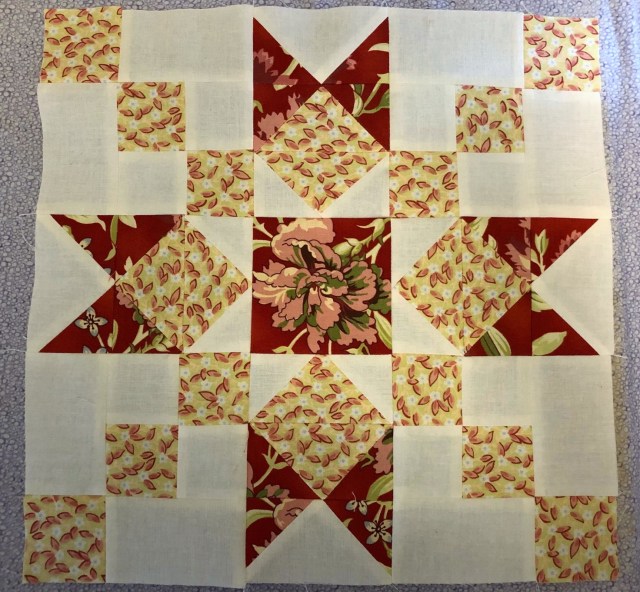
I did make a couple of small revisions to how it was made (making flying geese instead of sewing triangles and getting all fiddly.) This block also determined the size I am carrying on with. This is the 12″ block. Those little squares are only 2 inches (before sewing). I don’t work with pieces any smaller, so there was no way I was attempting the 8 or even 6 inch version! Yikes!

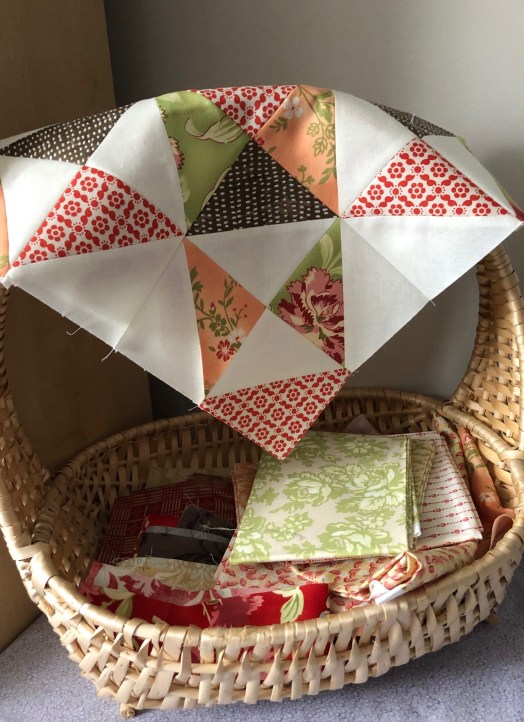
Block 2 was released on the 22nd. It was much easier, though I took a few liberties with it as well.

IMG_0952

Moda includes more “traditional” instructions for each block. I prefer more modern methods, so I used the 4 from 1 HST method, and whizzed through this one. The designer kept all her colours together in each quadrant, and I mixed them up. She also used plain blocks on each corner, and saved an HST of each colour for something else. I said “hang that!” and put them in!

But that’s the fun of this QAL. You can do it completely by the book or go right off the rails. It’s so fun checking out the facebook group to see what everyone is doing. Someone said the other day there is something like 30,000 members… wowza!

And of course, this is a new project, so it needed a project box. But since it’s going to be a year long project, I didn’t want it tying up one of my regular boxes month after month…

So she got her own!

IMG_0956

And now I have SIX quilting projects on the go (Thanks Mom….!). Here’s where everything else is at.

  • Spring Blossom – Still making beautiful batik blossoms.
  • Royal Stars – Still buildings stars – this one is not a fast project
  • Moon Dance – Loving this one! I hope to have the top done by the end of February, if not sooner.
  • The other birthday quilt – it doesnt’ have a name yet, and I actually haven’t started yet. Still need to cut those 10 white squares.
  • Blockhead: Two blocks done… over 50 to go. Wednesday takes so long to get here.
  • Leader and Ender quilt – Still making geese, but getting close to top assembly time.


Getting mooned

Jenn’s Birthday isn’t until mid-March, but here we are, approaching the end of January, and I’ve barely touched the blocks on her quilt.

I stole some time other other afternoon to bang out a few.

IMG_0793

I actually have five complete, but just photographed these four to give you an idea of the layout. They will have white sashing, with a black/grey paisley cornerstone.

Only 15 to go… I better get a move on!

Stitching in the Hammer

IMG_0943

As you can see, I’ve made some good progress on the Hamilton sock. That’s partly because Dave’s grandma ended up in the hospital this week, and Dave and I spent the better part of Monday keeping her company while they ran some tests. She home now though (thankfully it was nothing serious), and I’ve got the leg done and I’m ready to move onto the heel.

I’m on the downward slope!

(In case you’re wondering about the title…. The Hammer is Hamilton’s pet name)

FO: Les Chats Fantastiques

It’s cold and snowy here, and when it’s cold and snowy, there’s nothing better to do than quilt!

IMG_0900

So quilt I have been! And as a result, the Pins and Paws quilts (now appropriately named Les Chats Fantastiques) is complete! Isn’t it cute?

IMG_0901

It’s a fun pattern. Those cats go together so quick. And making them in an assortment of adorable cat fabric made it that much more fun.

IMG_0902

I showed you a glimpse of the flannel backing I had for it, but I have to show you the whole thing

IMG_0903

I had to piece it down the middle to have a wide enough back, and I’m so pleased with it.  I was very careful to line it up right, took my time, and it came out just purrfect!

The result is a sweet little lap blanket that wonderful from both sides!

FO: Voodoo doll

I mentioned earlier this month that I wanted to knit more for others. Particularly those in need.

Well neighbour Krista is going through some things… the kind of things where saying all the things you really want to say won’t make anything better. It’s the kind of situation where it’s better to take the high road, even though you really just want to light things on fire.

So I decided to put my needles to work to help her out….

IMG_0871

Yup. I knit her a voodoo doll.  The perfect way to get your frustrations out, while keeping to that high road.

IMG_0870

And isn’t it just the cutest little voodoo doll ever? The pattern I used is simple, and easy to follow.  It would make a great base for all kinds of stuffies… just add some rabbit ears, cat ears, or even floppy puppy ears!

IMG_0872

The heart pins have been hanging around my place for a while – the metal is just a little to thick for sewing (leaves big holes), but they are just perfect for this little guy. They even match the little fun foam heart on his chest.

One big birthday quilt

My sister-in-law Jenn will not be the only one to receive a birthday quilt this year. Terry, my second Mom (Sam’s Mom), has a very big birthday coming in May. And it deserves a very big present.

You guessed it… it’s going to be a VERY big quilt. As soon as I saw the Calico Star quilt tutorial on Missouri Star, I knew I wanted to do it. And it’s the perfect size for this birthday.

I had a pack of 10″ squares in these fabrics

aabaf5e7-384e-3ed7-b324-5bac68ecd8af

I pulled the batiks and a few of the lighter squares that wouldn’t work with the white background fabric, and subbed in a few squares cut from my fat quarter stash.

IMG_0790

Then came the challenge of mixing them up into five separate piles of nine squares (each pile will make two stars).  After much dithering, I finally got it done. Here’s a peak at one stack.

IMG_0791

Now I just have to cut 45 white 10″ squares to go with these…

IMG_0792

And I can get started!

Up a tree

One of the other exciting things about seeing Sam last weekend was that she had an extra special present for the cats.

You may or may not know, Sam manages a pet store. A couple days before our scheduled visit, an order of cat trees came into the store. But one of them was damaged – a big hole punched through the side of the box, and into the little hut. It was enough damage that they couldn’t sell it, but the tree was still usable, with some minor repairs. So she asked me if I’d like it.

I’ve been in the market for a cat tree since forever. I bought a small cheap one when we first moved here. But it was small and cheap, and well, it didn’t last very long.

The better ones are quite spendy, and while I love to spoil my babies, it just wasn’t in the budget (plus I blew all my money on dresses, candles and fabric…)

Anyway,  I of course, said YES!!!! Even though I wasn’t quite sure where I was going to put it. The ideal place, the back door, is taken up by my plants at the moment… and they have to be there because there just aren’t many places in this house with enough light. But I knew I’d figure something out

We loaded the box in my truck when I left, and there is stayed until Tuesday, when Dave headed off to work. This was for two reasons:

1) Dave and I don’t work well together when it comes to assembling furniture and the like. We both want to be the boss.

2) I knew Dave wasn’t going to be thrilled with where I finally decided to put it…

The bedroom! But there’s a few reasons for this placement:

1) The only windows on the front of our house are the front door, a teeny tiny high window in the powder room, and our bedroom windows. Burton NEVER gets to look out front, and he loves it. If I’m standing by the bedroom window, he’ll climb my leg until I pick him up and hold him at the window.

2) The dining room window (back of the house) is a no-go… it’s too close to the fish tank, which Burton already has too much interest in. (Plus I have a plant stand there)

3) There zero room in my studio (back of the house) because it’s office/sewing room/craft storage/library. It’s the smallest room in the house stuff with the most stuff)

4) Dave’s studio (back of the house) is absolutely off limits. The door is shut at all times and the cats are not allowed in there at all.

So like any smart wife, I waited until he was gone, and lugged the huge box in the house by myself.

Burton was intrigued from the first moment, and of course, had to snoopervise the assembly.

It didn’t take too long to put together, and there were minimal swear words. But soon enough…

IMG_0820

There’s just sooooooooooooo many new squirrels out front!!!


Take that, January blahs

The other day I was up early for a work call, and then found myself free for the rest of the day. Of course, I decided to sew.

I wasn’t in the mood to work on any of my current projects, and I had an empty project box. I wanted something mindless. Well not mindless… there really is no mindless sewing (not like knitting) – but something simple… and quick.

I had two charm packs squirreled away with plans to use them to make a disappearing nine patch.

It took about an hour to fiddle with combinations, and  I finally ended up with six cheerful nine patches, ready to be chopped up and reassembled.

IMG_0720

And that’s when things went off the rails… in the best way.

I decided that I didn’t want to do the usual (chop them in quarters, flip the pieces around, and then sew them back together). I wanted something different… but it DEFINITELY wasn’t mindless.

IMG_0721

I did chop them into quarters. But instead of sewing them back together, I created four separate piles. I took those piles to the design bed, and spent the next hour or so moving them around to create the perfect layout. Then sashing and cornerstones were added, a couple of borders, and voila!

IMG_0724

A colourful lap quilt (40″x 52″) perfect to chase away the January blahs. And another one for the to-quilt pile

IMG_0725

I’ve got this crazy patchwork piece for the back, and some nice sunshiny yellow for the binding. I better get up to Mom’s soon!