Walkabout Wednesday

Today’s walkabout is a bit of a cheat because these aren’t my pictures… but it is within walking distance, so I’m counting it…

When I’m bored, I frequently look at real estate listings. Why? I don’t really know… maybe to see where prices are at now… but more likely just to see inside other peoples houses… Whatever the reason, I was looking the other day, and a new house came up for sale in town.

It was the little asphalt sided one I posted about in mid-August – one that was the same style as our own.

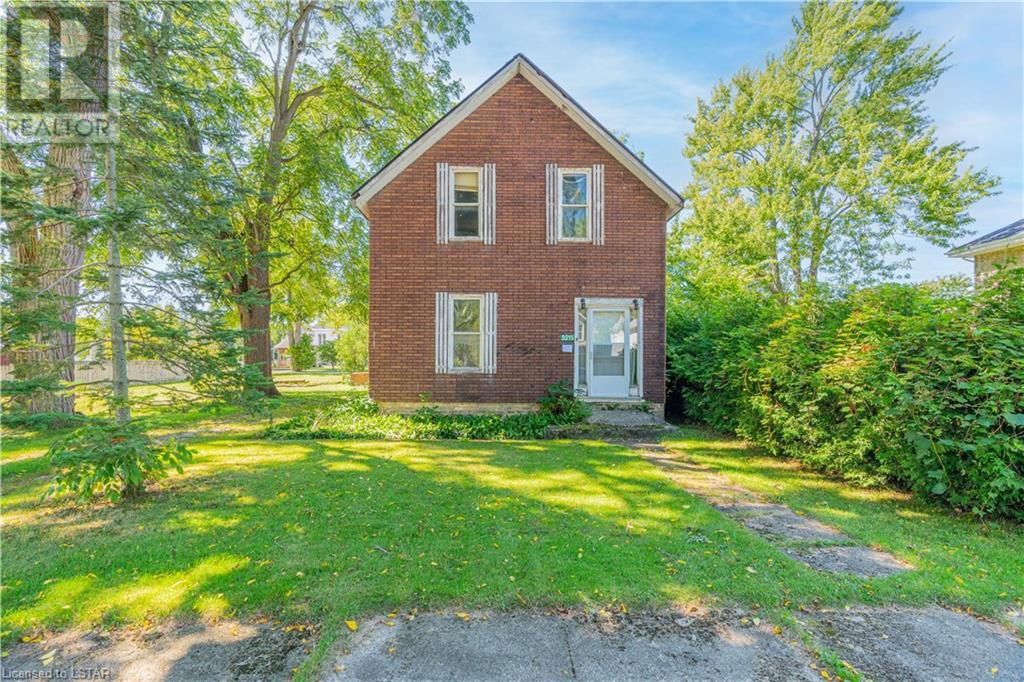
This was VERY exciting for me, because from what I could tell, it hadn’t been changed much from the original. Because of that, I wondered if it would still have some of the original character that was stripped from ours.

I started clicking through the pictures.

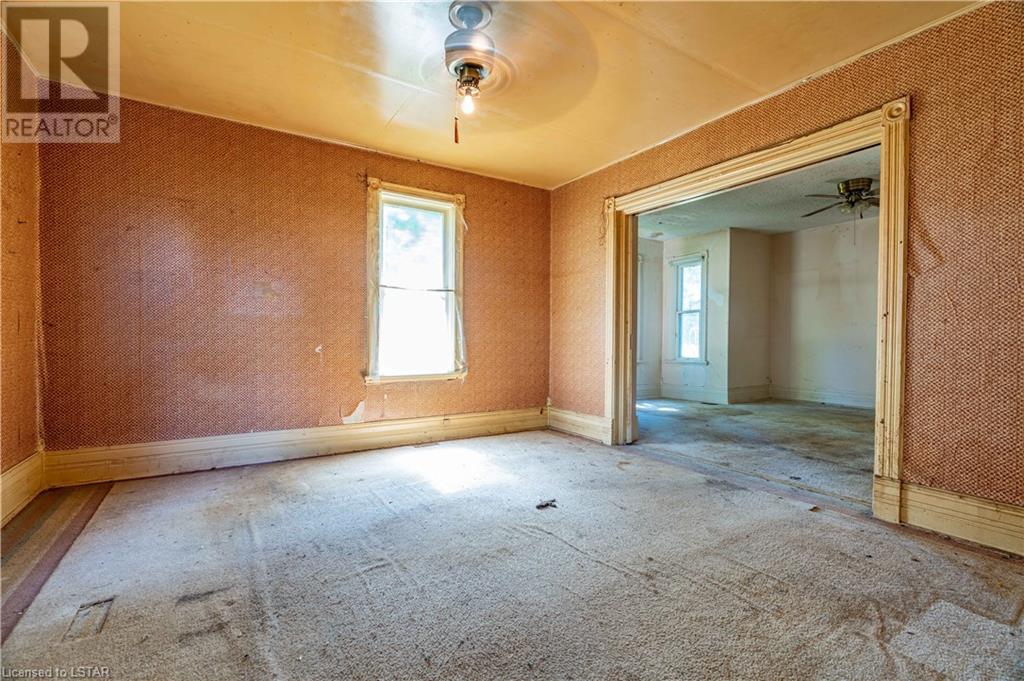
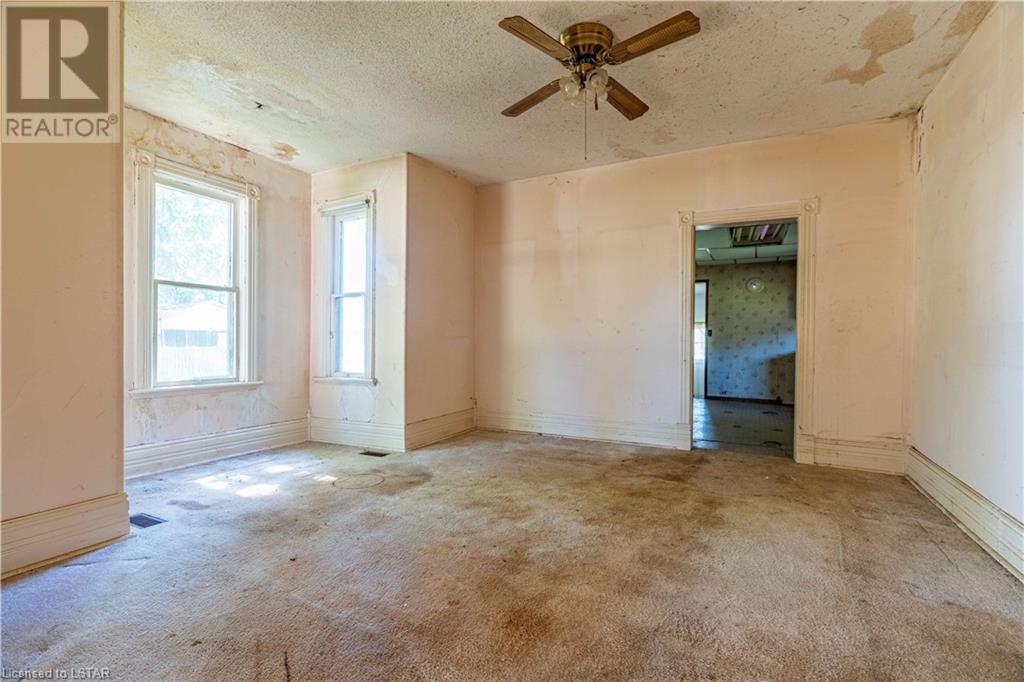
Like ours, it was in desperate need of a new refresh… but look at that baseboard!!! And door and window trim!!!!

The funny thing about that is Dave and I were talking about putting those same circle corner pieces around the windows. Not just because they look nice but because he won’t have to mitre as much!!! Now there’s no guarantee they are actually original because those windows, while not new, have been changed at some point.

I also wonder if that little bump out with the windows is original. I’ve seen it on a few, but not all of the houses of this style in town. If it existed on our house, it’s long gone now, because that’s the side where they added the addition to ours (and contains Dave’s studio).

But the baseboard I’m pretty sure if original, because we have some like it on our staircase, the only place where they didn’t strip it our in our house.

And speaking of those stairs…

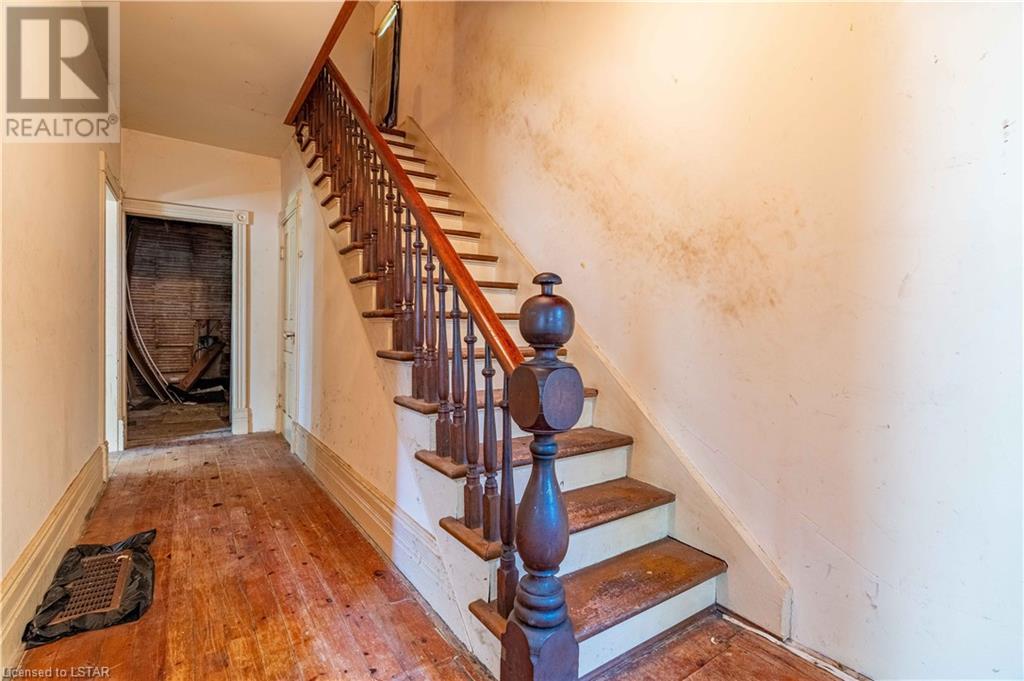
I can confirm that we have that EXACT newel post and bannister spindles, so I’m guessing that’s original. Ours is completely painted though (and will be repainted when we get to that part of the house). What’s interesting is we have original baseboard running up the stairs, but they seem to have taken it out in this house. And I wonder if that floor is original it looks like pine to me, but I’m not an expert.

The real estate listing for this house is here, but as it’s sold already, I’m not sure how long the link will work for.

Dave was VERY upset when I showed him the listing and he saw that the price was about 1/3 what we paid for ours. But I reminded him that prices in general haven’t actually dropped that far – someone must have REALLY wanted to get rid of this one.

Also… though this one does have an addition for the kitchen, it’s a fair bit smaller than our place – we have two extra bedrooms, and our rooms are bigger in general. There’s also only one bathroom in this house (we have two full bathrooms), an it’s only a single garage. And there’s no basement at all, where we have half basement/half crawl space under ours. And when you go through the other pictures on the site, the original plaster is really bad in some places, so we’d still be hanging drywall (his biggest peeve about this place).

That made him feel a good deal better. I for one, am still thrilled with our place. And with these pictures, I have somewhat of a historical reference, so we can add some of that character back in!

FO: Little yellow hat

There is still knitting going on here… not as much as I’d like, but enough to finish a simple yellow hat to go with the duck feet.

The pattern is Baxter Beanie. I omitted the stripes, but kept the pom pom, because nothing is cuter than a wee little pom pom.

Now I can get this and the quilt packed up and in the mail to Mom and baby. One more hat to go and then I can get back to the Christmas sweater.

The cats are hanging from the chandelier…

As soon as I got the Kitty Corn fabric last year, I knew just what I wanted to make with it. There was something about the colours, and fun retro prints that I thought would jive so well with the Chandelier quilt.

When I last made a Chandelier quilt a couple people commented that they couldn’t work out how it all went together.

It’s exceedingly easy, but looks complicated, which is my favourite type of project.

Each block is put together from seven pieces.

Just sew the small blocks to the long rectangles and then sew short rectangles to either side of the big block.

Sew those long pieces to either side and boom!

You have your block!

Then it’s just a matter of laying them on point and adding some setting triangles to the side.

Easy Peasy Rupert Squeezy! (Note: Rupert does not actually like to be squeezed, but he will accept gentle stroking)

An hour or two of sewing later…

And you’ve got any excessively stylish quilt top! I’m headed to Mom’s this weekend, and I’ve got the perfect backing and binding to wrap this one up with.

“Moth”er Flutter

There’s been no shortage of weird and wonderful creatures in the garden this year, but there’s one in particular, I’m very excited about.

Back at the beginning of August, Dave was sitting on the steps, smoking a cigar and watching me putter about in the catio yard, when all of a sudden he exclaimed, “What the heck is that???”

I came over to look, but by the time I got there, it was gone. So I asked him to describe it for me. “It was some sort of giant bee/bird thing.”

“Was it a hummingbird moth????” I asked with much excitement. I pulled up some pictures on my phone, and he confirmed, it was the strange creature he saw. As thrilled as I was, I was also a little sad and jealous… I’d never seen one in real life.

Over the next few weeks, he saw it several times, but always when I wasn’t around. I became convinced it was my own personal Polkaroo.

But then…

I was out deadheading the butterfly bush and something buzzed by my head and into the bush. It’s a hum similar to a hummingbird, but lower and softer. And as you can see, it’s a fantastical looking thing.

There are actually a few types of Hummingbird Moths, and this particular one is a Hummingbird Clearwing Moth.

And it’s pretty easy to see how it got that name. I’ve also seen them described as Flying Party Shrimp in a Velvet Suit… and that’s pretty accurate too.

I know I’ve complained before that so many of our moths are boring and beige, but this little guy more than makes up for it.

You can read more about these fascinating creatures here.

Garden glee

I don’t know about you, but I love seeing before and after pictures. Do you remember what the front of the house looked like when I first put in proper beds this May? Want to see what it looks like now.

Not bad for a season’s worth of growth. The garden across the front will need a bit of a revamp in the spring (just moving certain plants around to better spots), but I’m thrilled with the driveway garden. All my little ground covers have flourished. And both the Euonymus and Weeping Pussywillow are doing well.

But if you really want to see something wild… check out the catio…

It’s hard to tell that’s even the same space. Even I can’t get over the growth. It’s insane. You can barely even see my paths. The Blanket Flower, Sneezeweed and Purple violets are all going to be getting a new home come spring. They are just to big for that confined space. Though I’m thrilled with how well they’ve done. But the idea will be, nothing taller than the coneflowers in there.

And now that some things are well on their way to being established, I’m going to try to get rid of the Mulberry. It’s hard to see, but the far side of the catio has three Clematis, Honeysuckle, and a climbing rose growing up it. Out of frame on the near right is the enormous Butterfly bush. Those together should grow well and provide some shade for the kitties. (Plus they have their cabana).

Here’s a closer look at a few of the wild beauties.

Though it’s too big for the catio, I don’t regret buying the Sneezeweed. It’s a native plant and absolutely stunning with it’s pretty yellow blooms. It will look great in the border gardens along the fence next year.

Another native is this Smooth Aster. It took a long time to bloom (just started) but it’s another great late season addition. It’s a great contrast to the mostly yellow blooms of fall. I could probably leave it in the catio, it just grew sideways because the Mulberry was blocking most of its light. Still. I think it will end up in the border next year.

This gorgeous mum will be staying right where it is, though I’m going to have to keep on top of it and divide it when it gets too big. That’s not a hardship though – it’s pretty enough to spread all over the yard.

And these two massive beauties flank each side of the catio gate. They will definitely be getting split come spring, because they are ENORMOUS!

And the sedum is starting to bloom. I only have two clumps of this now, though I had it in every garden at the townhouse. I only brought one clump with me, and bought another this spring (I thought it was a different colour – it wasn’t). They will get split in spring too. And I’ll have it everywhere. It’s one of the best late season plants for the bees.

Out front those wild red zinnias are still rocking with False Sunflower. The zinnias won’t come back on their own next year, but I will start some more seeds, because they are awesome. And that False Sunflower is going to get a better spot, where it’s not in danger of getting run over by my lawn mower, because the plant is all flopped over the edge.

And last… I give you lilacs in fall. My Bloomerang Lilac has put up two small bloom spikes this week. It will be fun to see if we get more of a fall show as she matures.

The spooky season

I know… I know.. I mentioned the C-word on Tuesday and we aren’t even through Hallowe’en. But don’t worry, I haven’t forgotten about THE BEST HOLIDAY EVER!!!!

I’m just not knitting anything Hallowe’en related at the moment. Quilting is another matter though.

You will recall that back in July (when I wasn’t supposed to be spending any money) I bought a bunch of Hallowe’en fabrics. Well Burton and I have the purrfect idea for the coolest Hallowe’en quilt ever. And it was time to get everything cut up for it if we want it to be done before the day comes and goes. (Really, we should have started last month)

Ever the “helpful” companion, Burton was with me every step of the way. So much so that I finally had to give him his own project box, just so I could get work done.

Normally, he’s not this bad, but he really seems to like being on the new cutting table. And I can’t really blame him, it’s so much better than the old one. And in the end, I did get all the pieces cut.

I’m afraid you’re not going to see much of this one until the top is together. I don’t want to spoil the surprise, and seeing it in progress would do just that.

However, I will be able to share my progress on my SECOND Hallowe’en quilt. That’s right… there will be two!

Last year, Mom got me an awesome fat quarter bundle called Kitty Corn. Things were way to hectic to make it then, but I told myself, I’m not letting another Hallowe’en go by without making this quilt!

I’m making another Chandelier quilt, and with everything cut, this one will go together fast! I hope to make some progress on it this weekend. Stay tuned!

Walkabout Wednesday

I have been trying to walk everyday this past week. Sadly, I don’t seem to have much time to make any further than to the post office and back… but at least I’m getting out.

So this week… it’s all plants on my way to get the mail…

I love this great big hedge that surrounds this yard. They always keep it nice and tidy on the sides, so it never overhangs the sidewalk, but they definitely need to get a ladder or something to do that top!

On my route, there are two telephone poles that someone wrapped with chicken wire. It wasn’t apparent why until I saw the morning glories growing up them. The bottom 8 or so feet are cmpletely covered. They are looking a little worse for wear, but that’s probably because of how little rain we’ve had this summer.

Just down from that, the little verge garden I show a while back is doing very well. The marigold have been thrilled with the heat.

Rose of Sharon are not one of my favourite plants. I rank them along with hostas… but there are a couple of bushes along my walk that are just blooming like crazy. They also tend to attract Japanese beetles, which is another reason I don’t like them. I have enough problems keeping them off my roses!

Last week I showed you a planter just spilling over with petunias. Well I found these guys sprouting up in a weed patch, just under one of the town’s big hanging baskets. Some seeds must have fallen and these little guys managed to sprout.

One of the crab apple trees along the way is covered in these teeny tiny guys. I don’t know enough about crab apples, but they look rather small to me, and the tree doesn’t look overly healthy. But it could just be the dry summer.

And last… there’s still lots of green out there…

But there’s no denying autumn is on its way.

Duck… duck.. goose!

For the recipient of the duck quilt, I wanted to include a hat and booties (like I did when his sister was born), and I thought wouldn’t it be fun if they were duck-themed too???

So I went searching for a pattern. I found one, and started making it, but it really wasn’t working for me. But it gave me the idea that I could use basic sock math, and finagle something more like what I had in my head.

It took a little trial and error, but eventually….

… I got it! I am probably going to block them a little so the point on the toes are a little more pronounced. But over all, I got the look and feel I wanted.

I plan to whip up a plain yellow tuque to go with these, and then I have to make something for the recipient of the Fox quilt. Then I HAVE to get back to Dad’s sweater.

My Holly bush is a daily reminder that Christmas is not that far off…

Wedding blues…

… and purples!

It was finally time to get to work on the wedding quilt for my cousin, so Burton and I got to work making big HSTs for the Moda Love quilt. Thirty-six 9.5 inch HSTs to be exact. Working on two quadrants at a time, we laid them out on the design bed…

And we got sewing. (Well I did…. Burton went and had nap.) And before we knew it, I had those quadrants done, so I laid out the last two and they sewed up just as fast.

Then it was just a matter of rotating and sewing them all together.

As you can see, it gave us a good-sized quilt very quickly (72″ square) but we wanted this one really big.

So we got to work cutting and sewing borders and before long…

I had to take it outside because it was too big to show it all on the design bed. 90″ square now. I really recommend this pattern if you want to make a big quilt in a hurry.

Now I’ve got a date with Mom at the end of the month to get it quilted, in plenty of time for the November wedding!